Diferencia entre revisiones de «Circuito Huayhuash Andino (english)»
m (Texto reemplazado: «{{Trekking Perú}}» por «{{Trekking Peru}}») |
m (Texto reemplazado: « » por « ») |
||
| (No se muestran 7 ediciones intermedias del mismo usuario) | |||
| Línea 2: | Línea 2: | ||
{{Trekking Peru}} | {{Trekking Peru}} | ||
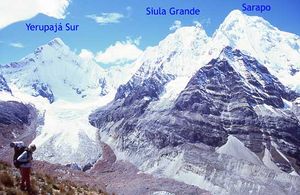
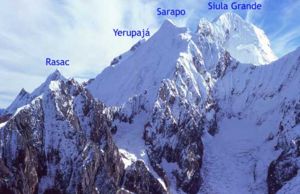
| − | [[ | + | [[File: Paso_Jurau.jpg|thumb|400px|Sarapo, Siula Grande Butcher Jurau seen from the step. Day 5 and 6. File: Juan Pablo Ortega]] |
| Línea 16: | Línea 16: | ||
==Considerations == | ==Considerations == | ||
| − | [[ | + | [[File: Jirishanca_pared_este.jpg|thumb|230px|East wall of Jirishanca Carhuacocha view from the lagoon. Day 7 and 8. File: Juan Pablo Ortega]] * This trek requires advanced knowledge of function in mountaineering by crossing two high mountain glaciers and some rock steps. |
* Much of trails there still a need for the road on their own | * Much of trails there still a need for the road on their own | ||
* The people of the Cordillera Huayhuash organized to combat crime and equip basic camping areas. This service is not free, you pay in the form of tolls established along the route is used or not the camps. Each toll is 30 soles per person approximately every year have gone up. The trek passes through 4 points of control. | * The people of the Cordillera Huayhuash organized to combat crime and equip basic camping areas. This service is not free, you pay in the form of tolls established along the route is used or not the camps. Each toll is 30 soles per person approximately every year have gone up. The trek passes through 4 points of control. | ||
| Línea 34: | Línea 34: | ||
==Route description == | ==Route description == | ||
| − | [[ | + | [[File: Jirishanca.jpg|thumb|400px|West wall of Jirishanca Jahucocha view from camp. Day 1 and 2. File: Juan Pablo Ortega]] |
{{Description Llamac - Jahuacocha}} | {{Description Llamac - Jahuacocha}} | ||
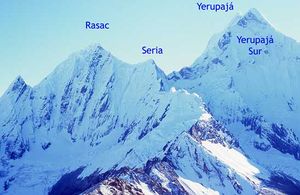
| − | *'''<span style = "color: green"> Walk through the day: Jahuacocha (4,030) - Step Sambu Punta (4,750) - Jahuacocha (4,030) [[ | + | *'''<span style = "color: green"> Walk through the day: Jahuacocha (4,030) - Step Sambu Punta (4,750) - Jahuacocha (4,030) [[File: Dia_2, _valle_Rasac.jpg|thumb|Day 2 Rasac Valley, seen from Co. Minapata. Paseo optional File: Juan Pablo Ortega]] |
The aim of this day off is to know and appreciate the beauty of the place, get used to the height and give you a comfortable rest back to the resentful, especially if you have not loaded backpack. | The aim of this day off is to know and appreciate the beauty of the place, get used to the height and give you a comfortable rest back to the resentful, especially if you have not loaded backpack. | ||
| − | Follow the signs that line the lagoon Jahuacocha its northern bank, after 1 hour has been to reach a moraine which borders north to the lagoon Solteracocha (not yet visible), to trace it begins to reveal the turquoise waters of the lagoon and the gigantic glacier Yerupaja. After 3 hours' walk from the camp will come to pass, rather than a spectacular view of the snowy valley. If it still has mood is highly recommended to leave the trail and up toward the hill immediately west Minapatá (left) of the step, so it will gain greater height along with best views and acclimatization to the days ahead. Simply upload any of their minor peaks for a complete view of the valley and especially the south Rasac Valley, place where the route continues to be followed the next day [[: | + | Follow the signs that line the lagoon Jahuacocha its northern bank, after 1 hour has been to reach a moraine which borders north to the lagoon Solteracocha (not yet visible), to trace it begins to reveal the turquoise waters of the lagoon and the gigantic glacier Yerupaja. After 3 hours' walk from the camp will come to pass, rather than a spectacular view of the snowy valley. If it still has mood is highly recommended to leave the trail and up toward the hill immediately west Minapatá (left) of the step, so it will gain greater height along with best views and acclimatization to the days ahead. Simply upload any of their minor peaks for a complete view of the valley and especially the south Rasac Valley, place where the route continues to be followed the next day [[: File: Dia_2, _valle_Rasac.jpg | ( view image )]].</span>'' ' |
*'''Day 2: Jahuacocha (4,030) - Barrosococha (4,624)''' | *'''Day 2: Jahuacocha (4,030) - Barrosococha (4,624)''' | ||
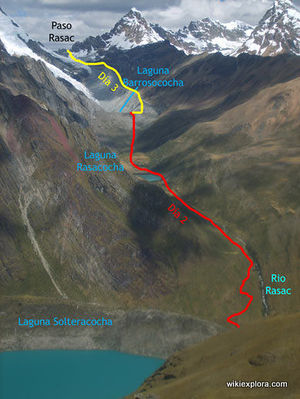
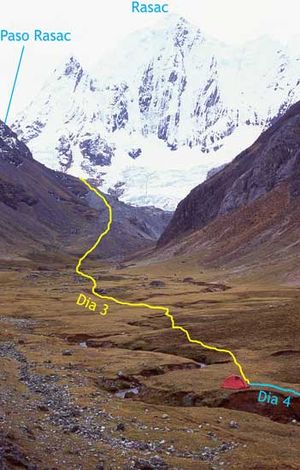
Jahuacocha skirting the lake for its north shore. Halfway between the two lakes to look south you will see the valley that has been rising, distinguishable by its river (Rasac) which drops abruptly to the valley of Jahuacocha. Leaving the road and cross to the south of the valley towards the ravine Rasac, this will have to cross the river and its wetlands Jahuacocha. On reaching the river Rasac move about 5 minutes to the north where you will find a path up the valley. After 45 will reach Rasacocha gap that is necessary to border on the west. Here you will find good places to camp, but should advance to the next lake to be closer to the step. On leaving Rasacocha the trail disappears, but the direction is clear, we must get to the bowl that forms the lagoon Barrosococha [[: image: Al_Paso_Rasac.jpg | (see picture)]]. After additional 1.5 hours to reach it. Although it is advisable to have time to camp in this place, above the good sites and water Escac. | Jahuacocha skirting the lake for its north shore. Halfway between the two lakes to look south you will see the valley that has been rising, distinguishable by its river (Rasac) which drops abruptly to the valley of Jahuacocha. Leaving the road and cross to the south of the valley towards the ravine Rasac, this will have to cross the river and its wetlands Jahuacocha. On reaching the river Rasac move about 5 minutes to the north where you will find a path up the valley. After 45 will reach Rasacocha gap that is necessary to border on the west. Here you will find good places to camp, but should advance to the next lake to be closer to the step. On leaving Rasacocha the trail disappears, but the direction is clear, we must get to the bowl that forms the lagoon Barrosococha [[: image: Al_Paso_Rasac.jpg | (see picture)]]. After additional 1.5 hours to reach it. Although it is advisable to have time to camp in this place, above the good sites and water Escac. | ||
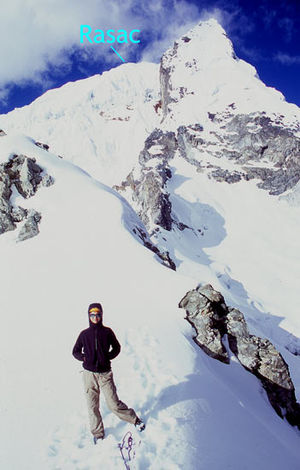
| − | *'''Day 3: Barrosococha (4,624) - Step Rasac (5,142) - Lag. Caramarca (4,575)'' '[[ | + | *'''Day 3: Barrosococha (4,624) - Step Rasac (5,142) - Lag. Caramarca (4,575)'' '[[File: Paso_Rasac.jpg|left|thumb|Day 3, Step Rasac. File: Juan Pablo Ortega]] |
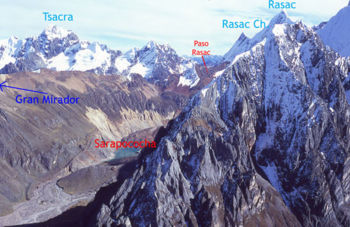
| − | [[ | + | [[File: Vista_Paso_Rasac.jpg|thumb|Day 3, view south from Step Rasac. File: Juan Pablo Ortega]] |
| − | Leaving the lake from the northwest, instead of continuing along the ridge of loose rocks of the moraine bordering the lagoon, should cross the moraine to reach the base of the hills of West Valley, which forms a valley mini which is easier to walk [[: image: Al_Paso_Rasac.jpg | (see picture)]]. After 2 hours up a rock wall gives order to the ward. Looking at the wall may be identified in it that formed a natural trail through the rocks, this is the path to be followed to do so will require an easy climb (5.7) of 4 yards to reach this corridor. It will be useful considering helping with the rope carried backpacks. Although this path by rocks [[ | + | Leaving the lake from the northwest, instead of continuing along the ridge of loose rocks of the moraine bordering the lagoon, should cross the moraine to reach the base of the hills of West Valley, which forms a valley mini which is easier to walk [[: image: Al_Paso_Rasac.jpg | (see picture)]]. After 2 hours up a rock wall gives order to the ward. Looking at the wall may be identified in it that formed a natural trail through the rocks, this is the path to be followed to do so will require an easy climb (5.7) of 4 yards to reach this corridor. It will be useful considering helping with the rope carried backpacks. Although this path by rocks [[File: Valle_Caramarca.jpg|thumb|Caramarca Valley. Day 3 and 4. File: Juan Pablo Ortega]] has a low technical difficulty, it is worth to use the rope railings, as the route has some degree of exposure. It is recommended in this section in the wall wearing a helmet at the fact of being in rocky area, but most likely will not drop anything. It is also advisable to wear jackets and cubremochilas due to the existence of small waterfalls in the middle of the road. Once this hurdle will come straight to the glacier. It is the responsibility of each assess conditions on the glacier to determine the need tying and if used crampons. From this point, is clearly distinguishable step that despite the closeness take about 1 hour to be reached. |
From this point and reveals for the first the south of the snowy Huayhuash. | From this point and reveals for the first the south of the snowy Huayhuash. | ||
Going down has to take special care with cracks since being south wall are presented in greater numbers. | Going down has to take special care with cracks since being south wall are presented in greater numbers. | ||
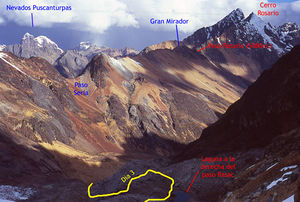
Differ from step 2 Laguna to the south, one to the right of it, smaller and closer, and a more distant valley at the base of [[: image: Vista_Paso_Rasac.jpg | (see picture)]]. | Differ from step 2 Laguna to the south, one to the right of it, smaller and closer, and a more distant valley at the base of [[: image: Vista_Paso_Rasac.jpg | (see picture)]]. | ||
Descending toward the nearest dodging cracks that occur after 1 hour was due to reach it. The glacier area ending at the level of the lagoon. In case of late have left the glacier camp is advisable in this area, otherwise they may continue to fall for an additional hour to reach the valley floor. To do this use the edges of the moraines left by the glaciers of long ago. Once in the valley, camping abound and cows too. | Descending toward the nearest dodging cracks that occur after 1 hour was due to reach it. The glacier area ending at the level of the lagoon. In case of late have left the glacier camp is advisable in this area, otherwise they may continue to fall for an additional hour to reach the valley floor. To do this use the edges of the moraines left by the glaciers of long ago. Once in the valley, camping abound and cows too. | ||
| − | + | ||
| − | *'''Day 4: Lag. Caramarca (4,575) - Step Rosario (5,128) - Qda Sarapococha (4,325)'' '[[ | + | *'''Day 4: Lag. Caramarca (4,575) - Step Rosario (5,128) - Qda Sarapococha (4,325)'' '[[File: Gran_Mirador.jpg|thumb|A view from the "Gran Mirador". Day 4. File: Juan Pablo Ortega]] |
| − | [[ | + | [[File:Paso_Rosario.jpg|left|thumb|View step down from Rosario. Day 4. File: Juan Pablo Ortega]] |
Southeast of the lake stands the first step Sarapococha Valley, Step It would, however, the passage through which transit will be the next step Rosario [[: image: Vista_Paso_Rasac.jpg | (see picture)] ]. Down the valley to the south by two kilometers, being up against his side Rosario Paso for approximately 2 hours to reach the edge will have one of the best views of the circuit that will see clearly the Yerupajá South, Rasac [http://es.wikipedia.org/wiki/Siula_Grande Siula Grande], Sarapo, Butcher, Huaraca, cheese, Trapeze and Nevados Puscanturpa south. If you have time and supplies is highly desirable camping on the edge so you can see the snow at sunset, in that case you need to load enough water from the valley. To get to refer to the drainage of the lagoon Sarapococha, famous for the book and film [http://es.wikipedia.org/wiki/Tocando_el_Vacío Touching the Void] ([http://en.wikipedia.org/wiki/ Touching_the_Void Touching the Void]) that tells the unfortunate first ascent of Siula Grande Joe Simpson and Simon Yates in 1985. On reaching the valley will find a well-defined path to the river that runs nearby Sarapacocha, down by it for 40 minutes to reach the lake patizales Jurau neighbors. If you are looking for supply two kilometers below the lake Jurau, is a house where people can get staples like cheese and potatoes, consider that the residents are not used to sell food. | Southeast of the lake stands the first step Sarapococha Valley, Step It would, however, the passage through which transit will be the next step Rosario [[: image: Vista_Paso_Rasac.jpg | (see picture)] ]. Down the valley to the south by two kilometers, being up against his side Rosario Paso for approximately 2 hours to reach the edge will have one of the best views of the circuit that will see clearly the Yerupajá South, Rasac [http://es.wikipedia.org/wiki/Siula_Grande Siula Grande], Sarapo, Butcher, Huaraca, cheese, Trapeze and Nevados Puscanturpa south. If you have time and supplies is highly desirable camping on the edge so you can see the snow at sunset, in that case you need to load enough water from the valley. To get to refer to the drainage of the lagoon Sarapococha, famous for the book and film [http://es.wikipedia.org/wiki/Tocando_el_Vacío Touching the Void] ([http://en.wikipedia.org/wiki/ Touching_the_Void Touching the Void]) that tells the unfortunate first ascent of Siula Grande Joe Simpson and Simon Yates in 1985. On reaching the valley will find a well-defined path to the river that runs nearby Sarapacocha, down by it for 40 minutes to reach the lake patizales Jurau neighbors. If you are looking for supply two kilometers below the lake Jurau, is a house where people can get staples like cheese and potatoes, consider that the residents are not used to sell food. | ||
*'''Day 5: Qda Sarapococha (4,325) - Step Jurau (5,053)''' | *'''Day 5: Qda Sarapococha (4,325) - Step Jurau (5,053)''' | ||
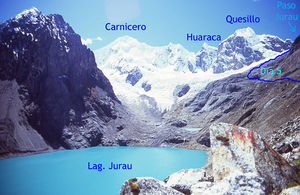
| − | [[ | + | [[File: Laguna_Jurau.jpg|thumb|View of the Laguna Jurau and Surrounds. Day 5. File: Juan Pablo Ortega]] |
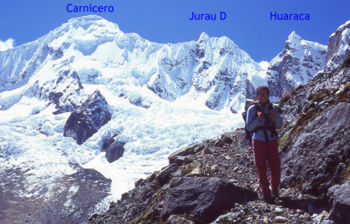
| − | [[ | + | [[File: Al_Paso_Jurau.jpg|left|thumb|350px|Way to step Jurau. Day 5. File: Juan Pablo Ortega]] |
From the camp across the river to the east side Sarapococha before it falls steeply into the valley of the river Calinca (where people live). will find a path parallel to the river which descends into the valley, down this trail until you find one that runs in a northeasterly direction, after 20 minutes takes us to the lagoon. At this trace the moraines south of the lagoon, where it forms a natural route toward the snow. Once on the edge of the moraine move in a northeasterly direction, as we advance height is gained, parts will need to "traverse" to keep the height gained. After 2 hours reach an area of rocky ground, where it will be much easier to march here changes the meaning to the south and now it begins to glimpse the valley east of Jurauraju take us across. Aided by good traction after 1.5 hours to reach the end of the valley, and you're very close to the line of snow and / or ice, it will be easier to walk by it to follow the moraines and irregularities of the Jurauraju skirt. This place is a good place to find a place to camp. If you decide to camp on the glacier near the pass, is recomdable away from the slopes of the Trapezium, as follows seracs can cause large avalanches. | From the camp across the river to the east side Sarapococha before it falls steeply into the valley of the river Calinca (where people live). will find a path parallel to the river which descends into the valley, down this trail until you find one that runs in a northeasterly direction, after 20 minutes takes us to the lagoon. At this trace the moraines south of the lagoon, where it forms a natural route toward the snow. Once on the edge of the moraine move in a northeasterly direction, as we advance height is gained, parts will need to "traverse" to keep the height gained. After 2 hours reach an area of rocky ground, where it will be much easier to march here changes the meaning to the south and now it begins to glimpse the valley east of Jurauraju take us across. Aided by good traction after 1.5 hours to reach the end of the valley, and you're very close to the line of snow and / or ice, it will be easier to walk by it to follow the moraines and irregularities of the Jurauraju skirt. This place is a good place to find a place to camp. If you decide to camp on the glacier near the pass, is recomdable away from the slopes of the Trapezium, as follows seracs can cause large avalanches. | ||
| − | + | ||
*'''Day 6: Step Jurau (5,053) - Pueblo Huayhuash (4,345)''' | *'''Day 6: Step Jurau (5,053) - Pueblo Huayhuash (4,345)''' | ||
*'''<span style = "color: green '> Ability to rise to Jurauraju (5,335) | *'''<span style = "color: green '> Ability to rise to Jurauraju (5,335) | ||
| − | [[ | + | [[File: Panoramica_desde_Jurauraju.jpg|thumb|View of the Laguna Jurau and Surrounds. Day 6. File: Juan Pablo Ortega]] |
If you decide to raise the Jurauraju, highly recommended, go south to reach the step in order to ascend the hill on the south side of its eastern slope and then move to its northernmost summit, this detour is due to that its northern section is more rugged and presents greater difficulties to upload it. After 1.5 hours you can enjoy the spectacular view. They emphasize the Sarapo [http://es.wikipedia.org/wiki/Siula_Grande Siula Grande] and Butcher with its glaciers and valleys to the north, after the Trapezium, cheese, Huaraca east and finally the snow Puscanturpa south. Suffice with 3-4 hours following the sale until it reaches the tent </span>'' ' | If you decide to raise the Jurauraju, highly recommended, go south to reach the step in order to ascend the hill on the south side of its eastern slope and then move to its northernmost summit, this detour is due to that its northern section is more rugged and presents greater difficulties to upload it. After 1.5 hours you can enjoy the spectacular view. They emphasize the Sarapo [http://es.wikipedia.org/wiki/Siula_Grande Siula Grande] and Butcher with its glaciers and valleys to the north, after the Trapezium, cheese, Huaraca east and finally the snow Puscanturpa south. Suffice with 3-4 hours following the sale until it reaches the tent </span>'' ' | ||
| − | [[ | + | [[File: Valle_del_Sarapococha.jpg|left|thumb|350px|Way to step Jurau. Day 6. File: Juan Pablo Ortega]] |
From the camp there are two options the way to go to camp Huayhuash. The first step is to distinguish more clearly that would take us to the snowy Puscanturpa after 30 minutes should be changed to this valley, crossing a glacier tongue and taking the step Huanacpatay Punta Trapeze. To choose the second 200 meters before the pass climbs up the glacier for 20 min in a northeasterly direction until they reached the next valley. The latter option is recommended if the ice conditions allow an easy progression. Down through the valley in a southeasterly direction to reach the base of the valley (about 20 minutes drive), here you will find some small cliffs that must be traversed, there are places where it will be easy down, taking time to find them. Overcome this little hurdle, headed toward Huayhuash (northeast). It is easy to descend slopes up after 1.5 hours will lead to a plain green and humid with some small gaps, then get into it you will find some small cliffs. While progress further north the cliffs grow in size, will be better returned a few meters to the south where it will be easy to overcome. Upon reaching the base of these roads parallel the river for 40 miutes Huayhuash until you reach the village of Huayhuash. When passing through the sector will have to pay toll for the second circuit (30 soles pp), payment of this grant us the right to pass and use the campameto. Huayhuash be achieved in basic food products with the residents. | From the camp there are two options the way to go to camp Huayhuash. The first step is to distinguish more clearly that would take us to the snowy Puscanturpa after 30 minutes should be changed to this valley, crossing a glacier tongue and taking the step Huanacpatay Punta Trapeze. To choose the second 200 meters before the pass climbs up the glacier for 20 min in a northeasterly direction until they reached the next valley. The latter option is recommended if the ice conditions allow an easy progression. Down through the valley in a southeasterly direction to reach the base of the valley (about 20 minutes drive), here you will find some small cliffs that must be traversed, there are places where it will be easy down, taking time to find them. Overcome this little hurdle, headed toward Huayhuash (northeast). It is easy to descend slopes up after 1.5 hours will lead to a plain green and humid with some small gaps, then get into it you will find some small cliffs. While progress further north the cliffs grow in size, will be better returned a few meters to the south where it will be easy to overcome. Upon reaching the base of these roads parallel the river for 40 miutes Huayhuash until you reach the village of Huayhuash. When passing through the sector will have to pay toll for the second circuit (30 soles pp), payment of this grant us the right to pass and use the campameto. Huayhuash be achieved in basic food products with the residents. | ||
*'''Day 7: Village Huayhuash (4,345) - Step Siula (4,834) - Carhuacocha (4,160)''' | *'''Day 7: Village Huayhuash (4,345) - Step Siula (4,834) - Carhuacocha (4,160)''' | ||
| − | [[ | + | [[File: Valle_del_Gangrajanca.jpg|thumb|350px|Three ponds in the valley of Gangrajanca. Day 7. File: Juan Pablo Ortega]] |
This day will be shared with people to make the [[Huayhuash Circuit]], which usually takes place in direction of clockwise, so many people will cross in opposite directions. Immediately after leaving the camp to the north will find a rise of 20 minutes duration. When you reach the plane and then walk 30 minutes to reach the lagoon Butcher, where the path forks. Both reach the same final camp, however the route Siula step is more scenic. The fork is not very clear, reference is to the top of the lagoon Butcher and just at the time that the route climbs a blade. Instead of climbing it should surround the pond until they reach a valley northwest of it, which must be traced to the north. The route is lost, but the direction is clear, as it distinguishes the way north, it reached the east side of the valley. In step the road reappears and takes us 20 minutes after Siula Passage Point (4,834). We will have a spectacular view of the east side of the Cordillera Huayhuash. The road descends to the northwest reaches a plateau and then continues down the west, suddenly reveal 3 lagoons of different shades of blue, followed one after another in the valley that descends. The slope off the road is steep, almost cliff. After going down the road passes beside the lake Siula (second gap) and on down the valley, the lake attracts Siula leave the path disappears into parts. As a general rule followed by the west side of the river valley. After an hour they should arrive at the end of Laguna Gangrajanca, that obscures the waters of the moraines product to its shore. On leaving this gap separates the road from the river and runs along the hillside looming to the northeast. Shortly after leaving the river will move a few meters from the house of a nice family. From here you can already see the valley where the lake is emplaced. 50 minutes later they arrive at the bridge of the river drainage of the lagoon. The road around the lake and begins to climb the north side after 15 minutes you arrive at camp (toll area). | This day will be shared with people to make the [[Huayhuash Circuit]], which usually takes place in direction of clockwise, so many people will cross in opposite directions. Immediately after leaving the camp to the north will find a rise of 20 minutes duration. When you reach the plane and then walk 30 minutes to reach the lagoon Butcher, where the path forks. Both reach the same final camp, however the route Siula step is more scenic. The fork is not very clear, reference is to the top of the lagoon Butcher and just at the time that the route climbs a blade. Instead of climbing it should surround the pond until they reach a valley northwest of it, which must be traced to the north. The route is lost, but the direction is clear, as it distinguishes the way north, it reached the east side of the valley. In step the road reappears and takes us 20 minutes after Siula Passage Point (4,834). We will have a spectacular view of the east side of the Cordillera Huayhuash. The road descends to the northwest reaches a plateau and then continues down the west, suddenly reveal 3 lagoons of different shades of blue, followed one after another in the valley that descends. The slope off the road is steep, almost cliff. After going down the road passes beside the lake Siula (second gap) and on down the valley, the lake attracts Siula leave the path disappears into parts. As a general rule followed by the west side of the river valley. After an hour they should arrive at the end of Laguna Gangrajanca, that obscures the waters of the moraines product to its shore. On leaving this gap separates the road from the river and runs along the hillside looming to the northeast. Shortly after leaving the river will move a few meters from the house of a nice family. From here you can already see the valley where the lake is emplaced. 50 minutes later they arrive at the bridge of the river drainage of the lagoon. The road around the lake and begins to climb the north side after 15 minutes you arrive at camp (toll area). | ||
*'''Day 8: Carhuacocha (4,160) - Mitococha (4,230)''' | *'''Day 8: Carhuacocha (4,160) - Mitococha (4,230)''' | ||
| − | [[ | + | [[File: Laguna_Carhuacocha.jpg|thumb|350px|Laguna Carhuacocha at dawn. Dia 8. File: Juan Pablo Ortega]] |
It is very recomendandable make the effort to rise early and go see the sunrise on the east end of the lagoon. If dawn is clear will have a wonderful panoramic Jirishanca, Chico and Yerupajá Yerupajá. Leaving the camp to the north in 20 minutes you will find a home where it will be possible abasterserse new provisions such as eggs, tomatoes and soft drinks in addition to potatoes and cheese. A short walk overcome a plateau after the road forks you follow the valley north Yanayana and the other west. It could take far north, the lagoon will also Mitacocha, however will take a more scenic route as we might expect more demanding. Since the fork up the hill to the northwest, which borders the valley Yanayana. This seems more difficult than it is, the grasslands will help a lot of them cling to power. In 45 minutes you reach the top, where they will have the final perspective of the snow in the south. After saying goodbye to them to continue along the ridge, following the occasional signs of livestock will pass on the east side of a rock formation that marked the edge at the end of this heading in a northeasterly direction without losing altitude do this will require a "traverse" 30 minutes to reach the mesesta lagoon where the Alcaycocha. Although the maps provides a way west of the lake should continue north where you will find better views. North Passage passes immediately west of Yanayana hill, then pass through the plane continued north for about 45 minutes to reach the edge of Yanayana revealing the view to the west. If enough water is brought from the pond this is a good place for an alternative camopamento. From here take westward and down the slope. After 25 minutes of descent leads to another large flag of the north-south in the middle slope. From this point you will appreciate the lagoon Mitococha, however you will need to make a long detour to reach it. Follow the flag in a north, 30 minutes after starting on the main valley Descenza what we take 20 more minutes. Once we reach it, go around the hill just southwest down to reach the lagoon Mitococha after 20 minutes. While evading the toll is a new sector could eventually require the payment of it. | It is very recomendandable make the effort to rise early and go see the sunrise on the east end of the lagoon. If dawn is clear will have a wonderful panoramic Jirishanca, Chico and Yerupajá Yerupajá. Leaving the camp to the north in 20 minutes you will find a home where it will be possible abasterserse new provisions such as eggs, tomatoes and soft drinks in addition to potatoes and cheese. A short walk overcome a plateau after the road forks you follow the valley north Yanayana and the other west. It could take far north, the lagoon will also Mitacocha, however will take a more scenic route as we might expect more demanding. Since the fork up the hill to the northwest, which borders the valley Yanayana. This seems more difficult than it is, the grasslands will help a lot of them cling to power. In 45 minutes you reach the top, where they will have the final perspective of the snow in the south. After saying goodbye to them to continue along the ridge, following the occasional signs of livestock will pass on the east side of a rock formation that marked the edge at the end of this heading in a northeasterly direction without losing altitude do this will require a "traverse" 30 minutes to reach the mesesta lagoon where the Alcaycocha. Although the maps provides a way west of the lake should continue north where you will find better views. North Passage passes immediately west of Yanayana hill, then pass through the plane continued north for about 45 minutes to reach the edge of Yanayana revealing the view to the west. If enough water is brought from the pond this is a good place for an alternative camopamento. From here take westward and down the slope. After 25 minutes of descent leads to another large flag of the north-south in the middle slope. From this point you will appreciate the lagoon Mitococha, however you will need to make a long detour to reach it. Follow the flag in a north, 30 minutes after starting on the main valley Descenza what we take 20 more minutes. Once we reach it, go around the hill just southwest down to reach the lagoon Mitococha after 20 minutes. While evading the toll is a new sector could eventually require the payment of it. | ||
*'''Day 9: Mitococha (4,230) - Jancacota Pampa (4,150)''' | *'''Day 9: Mitococha (4,230) - Jancacota Pampa (4,150)''' | ||
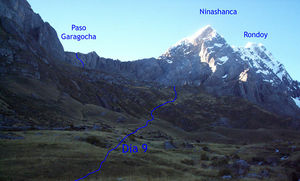
| − | [[ | + | [[File: Paso_Garagocha.jpg|thumb|350px|Step Garagocha. Day 9. File: Anne Bartley]] |
This day will be one of the most technical, it will require an escalation in rock, though a simple climbing the fact of carrying a backpack and equipment shortages will add difficulty, also require some [[http://es.wikipedia.org/wiki/Abseiling "rappeling"]] and the entire travel day for lack of roads, where the descent will be particularly complicated by the fact of being in an area of cliffs and may be due rappeler some if not studied the route well. On the other hand, the view from the lower step is beauty to be compared with the other steps of the circuit. If not looking for a high dose of adventure will be better to take other routes further north such as connecting to the [[Huayhuash Circuit]] or another step of Paria cord. | This day will be one of the most technical, it will require an escalation in rock, though a simple climbing the fact of carrying a backpack and equipment shortages will add difficulty, also require some [[http://es.wikipedia.org/wiki/Abseiling "rappeling"]] and the entire travel day for lack of roads, where the descent will be particularly complicated by the fact of being in an area of cliffs and may be due rappeler some if not studied the route well. On the other hand, the view from the lower step is beauty to be compared with the other steps of the circuit. If not looking for a high dose of adventure will be better to take other routes further north such as connecting to the [[Huayhuash Circuit]] or another step of Paria cord. | ||
From the lake up the hills to the north, after 1 hour should arrive at the base of the rock wall distinguished by a carry [[: image: Paso_Garagocha_Este_2.jpg | (see picture)]]. Looking to the cord of Paria, will be two possible steps, the South will rise. After hauling up a throat then take us 45 minutes to the base of the rock. The climb is long with a 5.7 graduation approached by several terraces facilitate the ascent, the maximum gradient is 70 °. While one can dispense with the rope is advisable to secure the route with one. | From the lake up the hills to the north, after 1 hour should arrive at the base of the rock wall distinguished by a carry [[: image: Paso_Garagocha_Este_2.jpg | (see picture)]]. Looking to the cord of Paria, will be two possible steps, the South will rise. After hauling up a throat then take us 45 minutes to the base of the rock. The climb is long with a 5.7 graduation approached by several terraces facilitate the ascent, the maximum gradient is 70 °. While one can dispense with the rope is advisable to secure the route with one. | ||
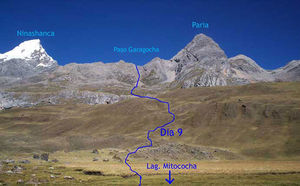
| − | [[ | + | [[File: Paso_Garagocha_Oeste.jpg|left|thumb|Step Garagocha seen from the west. Day 9-10. File: Juan Pablo Ortega]] |
| − | [[ | + | [[File: Paso_Garagocha_Este.jpg|thumb|Step Garagocha seen from the east. Day 9. File: Juan Pablo Ortega]] |
| − | On reaching the pass we will have a partial picture of Huayhuash massif, Ninashanca product that cover the rest [[: | + | On reaching the pass we will have a partial picture of Huayhuash massif, Ninashanca product that cover the rest [[: File: Paso_Garagocha.jpg | (see picture)]]. Of all the steps that have been made will be less impressive. Rappeler will need to download the first few meters above [[: File: Paso_Garagocha_Oeste_2.jpg | (see picture)]]. Down westbound (just south) and go down after 45 minutes will reach some cliffs that fall directly into the lagoon Garogocha, traverser north along a nature trail that forms between the rocks a bit before reaching the above cliff, follow it until it connects with no rocky hillside on the north side of the lagoon. By letting it go back down to the northwest without losing sight of the many cliffs that still happen. On reaching the valley establish Jancacota camp Pampa, 5th toll. |
*'''Day 10: Jancacota Pampa (4,150) - Llamac (3,250)''' | *'''Day 10: Jancacota Pampa (4,150) - Llamac (3,250)''' | ||
Revisión actual del 10:15 15 nov 2016
Trail
<googlemap version="0.9" lat="-10.269654" lon="-76.91597" zoom="11"> http://www.wikiexplora.com/kml/Circuito_Huayhuash_Andino.kml </googlemap>
Season
The right time is from late April to early October, ideal for the months of June and July.
Considerations
- Much of trails there still a need for the road on their own
- The people of the Cordillera Huayhuash organized to combat crime and equip basic camping areas. This service is not free, you pay in the form of tolls established along the route is used or not the camps. Each toll is 30 soles per person approximately every year have gone up. The trek passes through 4 points of control.
- Peruvians are exempt from payment.
- If you are looking for economy, barter of sweet products is very satisfactory to both parties (juice powder, chocolates, cookies, etc.).
- You can resupply of commodities such as cheese, eggs, rice and potatoes in the homes of herdsmen along the circuit.
- You can not do this track with support animals because that is required to make two crossings of glaciers, but there could coordinate with a local carrier reaprovicionarse some strategic meetings
Special equipment needed
- 1:50,000 topographic map, ice ax, crampons, 2 piles of snow, 2 ice screws, mountain rope, harness, good coat and a backpack
Access by car and the road status
Access by public transport and hitchhiking
A "combi" leaves from Chiquián everyday around 9:00 a.m. heading towards Llamac. You will have to pay more for backpacks. It is possible to arrive at Chiquián directly from Lima or Huaraz. It is also possible to catch a Lima-Huaraz-Lima bus and get off at the fork to Chiquián, where a taxi can be shared with locals (10 soles per passenger, approx.) These generally wait around the fork when the buses are scheduled to arrive.
Route description
At the entrance to Llamac, even before leaving the bus, is the first toll of 30 soles per person (save the receipt). Not be left pending purchases for the trek, as it is only possible to find basic markets, however, the area is a place of entry and exit of hikers, with a bit of luck and can have the time to look for.
- Day 1: Llamac (3,250) - Jahuacocha (4,030)
Leave Llamac heading southwest. The trail ascends quickly. After two hours of ascent you will arrive at a hydroelectric plant where there is a fork. Both paths arrive at Jahuacocha. One option is to follow the channel that feeds the aforementioned plant, but it is quite long and sometimes difficult to follow. The better alternative is to go through the pass (4,300 meters), which is highly recommended for its panoramic view of the Huayhuash peaks. However, to reach the pass you will have to ascend for two more hours on the clear-cut path. From the pass there are still two hours of hiking through beautiful camp to the west of the Jahuacocha lagoon, where you can appreciate the northern half of the Huayhuash peaks. Upon arrival to the camp, there will be people charging for entrance to the area. However, if you came from Llamac you won't have to pay it, just show your ticket. If you want to stock up on provisions, some houses in the area offer breakfasts and simple food as well as beer.
- Walk through the day: Jahuacocha (4,030) - Step Sambu Punta (4,750) - Jahuacocha (4,030)
The aim of this day off is to know and appreciate the beauty of the place, get used to the height and give you a comfortable rest back to the resentful, especially if you have not loaded backpack.
Follow the signs that line the lagoon Jahuacocha its northern bank, after 1 hour has been to reach a moraine which borders north to the lagoon Solteracocha (not yet visible), to trace it begins to reveal the turquoise waters of the lagoon and the gigantic glacier Yerupaja. After 3 hours' walk from the camp will come to pass, rather than a spectacular view of the snowy valley. If it still has mood is highly recommended to leave the trail and up toward the hill immediately west Minapatá (left) of the step, so it will gain greater height along with best views and acclimatization to the days ahead. Simply upload any of their minor peaks for a complete view of the valley and especially the south Rasac Valley, place where the route continues to be followed the next day ( view image ). '
- Day 2: Jahuacocha (4,030) - Barrosococha (4,624)
Jahuacocha skirting the lake for its north shore. Halfway between the two lakes to look south you will see the valley that has been rising, distinguishable by its river (Rasac) which drops abruptly to the valley of Jahuacocha. Leaving the road and cross to the south of the valley towards the ravine Rasac, this will have to cross the river and its wetlands Jahuacocha. On reaching the river Rasac move about 5 minutes to the north where you will find a path up the valley. After 45 will reach Rasacocha gap that is necessary to border on the west. Here you will find good places to camp, but should advance to the next lake to be closer to the step. On leaving Rasacocha the trail disappears, but the direction is clear, we must get to the bowl that forms the lagoon Barrosococha (see picture). After additional 1.5 hours to reach it. Although it is advisable to have time to camp in this place, above the good sites and water Escac.
- 'Day 3: Barrosococha (4,624) - Step Rasac (5,142) - Lag. Caramarca (4,575) '
From this point and reveals for the first the south of the snowy Huayhuash. Going down has to take special care with cracks since being south wall are presented in greater numbers. Differ from step 2 Laguna to the south, one to the right of it, smaller and closer, and a more distant valley at the base of (see picture). Descending toward the nearest dodging cracks that occur after 1 hour was due to reach it. The glacier area ending at the level of the lagoon. In case of late have left the glacier camp is advisable in this area, otherwise they may continue to fall for an additional hour to reach the valley floor. To do this use the edges of the moraines left by the glaciers of long ago. Once in the valley, camping abound and cows too.
- 'Day 4: Lag. Caramarca (4,575) - Step Rosario (5,128) - Qda Sarapococha (4,325) '
Southeast of the lake stands the first step Sarapococha Valley, Step It would, however, the passage through which transit will be the next step Rosario [[ image: Vista_Paso_Rasac.jpg | (see picture)] ]. Down the valley to the south by two kilometers, being up against his side Rosario Paso for approximately 2 hours to reach the edge will have one of the best views of the circuit that will see clearly the Yerupajá South, Rasac Siula Grande, Sarapo, Butcher, Huaraca, cheese, Trapeze and Nevados Puscanturpa south. If you have time and supplies is highly desirable camping on the edge so you can see the snow at sunset, in that case you need to load enough water from the valley. To get to refer to the drainage of the lagoon Sarapococha, famous for the book and film Touching the Void (Touching_the_Void Touching the Void) that tells the unfortunate first ascent of Siula Grande Joe Simpson and Simon Yates in 1985. On reaching the valley will find a well-defined path to the river that runs nearby Sarapacocha, down by it for 40 minutes to reach the lake patizales Jurau neighbors. If you are looking for supply two kilometers below the lake Jurau, is a house where people can get staples like cheese and potatoes, consider that the residents are not used to sell food.
- Day 5: Qda Sarapococha (4,325) - Step Jurau (5,053)
From the camp across the river to the east side Sarapococha before it falls steeply into the valley of the river Calinca (where people live). will find a path parallel to the river which descends into the valley, down this trail until you find one that runs in a northeasterly direction, after 20 minutes takes us to the lagoon. At this trace the moraines south of the lagoon, where it forms a natural route toward the snow. Once on the edge of the moraine move in a northeasterly direction, as we advance height is gained, parts will need to "traverse" to keep the height gained. After 2 hours reach an area of rocky ground, where it will be much easier to march here changes the meaning to the south and now it begins to glimpse the valley east of Jurauraju take us across. Aided by good traction after 1.5 hours to reach the end of the valley, and you're very close to the line of snow and / or ice, it will be easier to walk by it to follow the moraines and irregularities of the Jurauraju skirt. This place is a good place to find a place to camp. If you decide to camp on the glacier near the pass, is recomdable away from the slopes of the Trapezium, as follows seracs can cause large avalanches.
- Day 6: Step Jurau (5,053) - Pueblo Huayhuash (4,345)
- Ability to rise to Jurauraju (5,335)
If you decide to raise the Jurauraju, highly recommended, go south to reach the step in order to ascend the hill on the south side of its eastern slope and then move to its northernmost summit, this detour is due to that its northern section is more rugged and presents greater difficulties to upload it. After 1.5 hours you can enjoy the spectacular view. They emphasize the Sarapo Siula Grande and Butcher with its glaciers and valleys to the north, after the Trapezium, cheese, Huaraca east and finally the snow Puscanturpa south. Suffice with 3-4 hours following the sale until it reaches the tent '
From the camp there are two options the way to go to camp Huayhuash. The first step is to distinguish more clearly that would take us to the snowy Puscanturpa after 30 minutes should be changed to this valley, crossing a glacier tongue and taking the step Huanacpatay Punta Trapeze. To choose the second 200 meters before the pass climbs up the glacier for 20 min in a northeasterly direction until they reached the next valley. The latter option is recommended if the ice conditions allow an easy progression. Down through the valley in a southeasterly direction to reach the base of the valley (about 20 minutes drive), here you will find some small cliffs that must be traversed, there are places where it will be easy down, taking time to find them. Overcome this little hurdle, headed toward Huayhuash (northeast). It is easy to descend slopes up after 1.5 hours will lead to a plain green and humid with some small gaps, then get into it you will find some small cliffs. While progress further north the cliffs grow in size, will be better returned a few meters to the south where it will be easy to overcome. Upon reaching the base of these roads parallel the river for 40 miutes Huayhuash until you reach the village of Huayhuash. When passing through the sector will have to pay toll for the second circuit (30 soles pp), payment of this grant us the right to pass and use the campameto. Huayhuash be achieved in basic food products with the residents.
- Day 7: Village Huayhuash (4,345) - Step Siula (4,834) - Carhuacocha (4,160)
This day will be shared with people to make the Huayhuash Circuit, which usually takes place in direction of clockwise, so many people will cross in opposite directions. Immediately after leaving the camp to the north will find a rise of 20 minutes duration. When you reach the plane and then walk 30 minutes to reach the lagoon Butcher, where the path forks. Both reach the same final camp, however the route Siula step is more scenic. The fork is not very clear, reference is to the top of the lagoon Butcher and just at the time that the route climbs a blade. Instead of climbing it should surround the pond until they reach a valley northwest of it, which must be traced to the north. The route is lost, but the direction is clear, as it distinguishes the way north, it reached the east side of the valley. In step the road reappears and takes us 20 minutes after Siula Passage Point (4,834). We will have a spectacular view of the east side of the Cordillera Huayhuash. The road descends to the northwest reaches a plateau and then continues down the west, suddenly reveal 3 lagoons of different shades of blue, followed one after another in the valley that descends. The slope off the road is steep, almost cliff. After going down the road passes beside the lake Siula (second gap) and on down the valley, the lake attracts Siula leave the path disappears into parts. As a general rule followed by the west side of the river valley. After an hour they should arrive at the end of Laguna Gangrajanca, that obscures the waters of the moraines product to its shore. On leaving this gap separates the road from the river and runs along the hillside looming to the northeast. Shortly after leaving the river will move a few meters from the house of a nice family. From here you can already see the valley where the lake is emplaced. 50 minutes later they arrive at the bridge of the river drainage of the lagoon. The road around the lake and begins to climb the north side after 15 minutes you arrive at camp (toll area).
- Day 8: Carhuacocha (4,160) - Mitococha (4,230)
It is very recomendandable make the effort to rise early and go see the sunrise on the east end of the lagoon. If dawn is clear will have a wonderful panoramic Jirishanca, Chico and Yerupajá Yerupajá. Leaving the camp to the north in 20 minutes you will find a home where it will be possible abasterserse new provisions such as eggs, tomatoes and soft drinks in addition to potatoes and cheese. A short walk overcome a plateau after the road forks you follow the valley north Yanayana and the other west. It could take far north, the lagoon will also Mitacocha, however will take a more scenic route as we might expect more demanding. Since the fork up the hill to the northwest, which borders the valley Yanayana. This seems more difficult than it is, the grasslands will help a lot of them cling to power. In 45 minutes you reach the top, where they will have the final perspective of the snow in the south. After saying goodbye to them to continue along the ridge, following the occasional signs of livestock will pass on the east side of a rock formation that marked the edge at the end of this heading in a northeasterly direction without losing altitude do this will require a "traverse" 30 minutes to reach the mesesta lagoon where the Alcaycocha. Although the maps provides a way west of the lake should continue north where you will find better views. North Passage passes immediately west of Yanayana hill, then pass through the plane continued north for about 45 minutes to reach the edge of Yanayana revealing the view to the west. If enough water is brought from the pond this is a good place for an alternative camopamento. From here take westward and down the slope. After 25 minutes of descent leads to another large flag of the north-south in the middle slope. From this point you will appreciate the lagoon Mitococha, however you will need to make a long detour to reach it. Follow the flag in a north, 30 minutes after starting on the main valley Descenza what we take 20 more minutes. Once we reach it, go around the hill just southwest down to reach the lagoon Mitococha after 20 minutes. While evading the toll is a new sector could eventually require the payment of it.
- Day 9: Mitococha (4,230) - Jancacota Pampa (4,150)
This day will be one of the most technical, it will require an escalation in rock, though a simple climbing the fact of carrying a backpack and equipment shortages will add difficulty, also require some ["rappeling"] and the entire travel day for lack of roads, where the descent will be particularly complicated by the fact of being in an area of cliffs and may be due rappeler some if not studied the route well. On the other hand, the view from the lower step is beauty to be compared with the other steps of the circuit. If not looking for a high dose of adventure will be better to take other routes further north such as connecting to the Huayhuash Circuit or another step of Paria cord. From the lake up the hills to the north, after 1 hour should arrive at the base of the rock wall distinguished by a carry (see picture). Looking to the cord of Paria, will be two possible steps, the South will rise. After hauling up a throat then take us 45 minutes to the base of the rock. The climb is long with a 5.7 graduation approached by several terraces facilitate the ascent, the maximum gradient is 70 °. While one can dispense with the rope is advisable to secure the route with one.
On reaching the pass we will have a partial picture of Huayhuash massif, Ninashanca product that cover the rest (see picture). Of all the steps that have been made will be less impressive. Rappeler will need to download the first few meters above (see picture). Down westbound (just south) and go down after 45 minutes will reach some cliffs that fall directly into the lagoon Garogocha, traverser north along a nature trail that forms between the rocks a bit before reaching the above cliff, follow it until it connects with no rocky hillside on the north side of the lagoon. By letting it go back down to the northwest without losing sight of the many cliffs that still happen. On reaching the valley establish Jancacota camp Pampa, 5th toll.
- Day 10: Jancacota Pampa (4,150) - Llamac (3,250)
Down the valley from north to the south side of the river, the road is well marked. After 45 minutes of walk will reach the main road, traveled by cars and trucks from the mining sector diverasa. Even 15 kilometers separate us from Llamac, these can be done on foot, or hitch, with this second method increases the chances of being misled by local private vehicle to go and avoid paying the 6th toll to reach Pocpa
Permits / Fees
- This trek does not require permits, but will cost approximately 150 soles, paid in form of 5 tolls along the route to groups of farmers from 30 soles each.
Waypoints in Google Earth and Map Source
To download the file right-click and then select "Save file as" (IE) or "Save link as" (Firefox, Chrome). By trying to open it directly, some browsers will show the raw code with the coordinates.
Bibliography and cartography
- Huayhuash Topographic Map 1:50,000, 2004 2nd edition
- Peak and Places
- Book: Climbs and treks in the Cordillera Huayhuash of Peru, Jeremy Frima


