ENG:Cerro Roble Alto
|
|
|
| |||||||||||||||||||||||||||||||||||||||||||||||||||||
Appropriate time
All year. Ideal at the end of May and the beginning of June, when the oak is red. Avoid the hottest months of the year, between the beginning of December and March.
Access
In vehicle
A Lampa can be accessed by Route 5 North (Autopista Central) or Vespucio Norte. The second is recommended.
Going through Vespucio Norte towards the West, 4.9 kilometers after the junction with Autopista Central, turn right and take the Camino Lo Echevers. Put the mileage to zero at this point.
Advance to the town of Lampa, where the road we come will be transformed into Avenida Barros Luco. Advance until it ends, and turn left into Miraflores. A little further on, you will reach a diamond point: take the right and follow Manuel Montt, until Antonio Varas, where you should turn left. After one block, you get to Avenida Isabel Riquelme. Turn right and go 8,4 kilometers for this new road, until a blue gate to the left of the road, where there is space to park. A few meters behind this gate, there is a large white metal structure, tubular in shape, which forms the skeleton of what was to be a cable car station.
It's 26.6 kilometers since Vespucio Norte was left.
In public transport and hitchhiking
From the Vespucio Norte metro station, at the terminus of line 2, there are buses to Lampa. See detalles. From Lampa, there are good chances of hitchhiking to the point of departure, it is a road with a lot of traffic.
Description of the route
'Note' : This route is considerably longer than a direct ascent on the East side. However, the path is much clearer, you can enjoy the oak tree, and you get a pleasant walk along the Somali plateau overlooking the Andes.
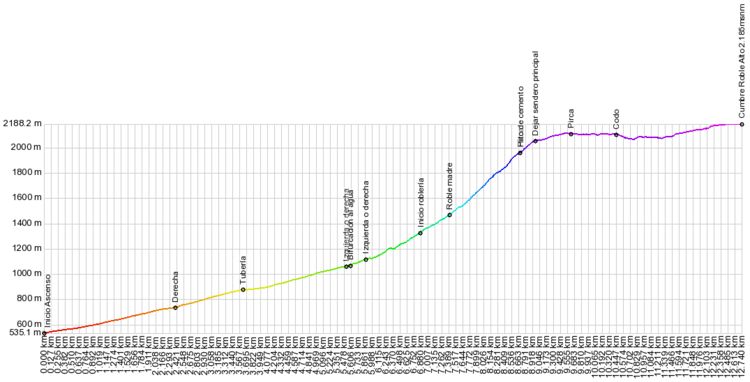
From the gate (km 0 - 537m), move towards the white metal structure along the wide vehicular road. Soon you will go through an informative map, which indicates the lagoon as "reservoir". The route throughout this stretch is very clear, and with little slope. At km 2.4 (740m) you pass by a clear path that starts to the left, but you should not take it, but continue to the right along the vehicular road.
At km 3.6 (880m) you will reach an elbow on the road, where there is a large pipe. There is a temptation to continue straight, but not: follow along the elbow, always by the vehicular road. It has already gained a certain height, and the valley of Lampa begins to be visible behind us.
At km 5.5 (1060m), already with the narrowest footprint, you come to a bifurcation. Both lead to destination, but if you want to supply water you must take the left. 70 meters ahead of said point, there is a new fork: on the left, the clearest footprint, leads to the only point with water on the route (all year round) in the shade of a leafy forest of quillayes. Accessing the estuary implies a detour of 75 meters, which must then be retraced. To the right, the route that leads to the lagoon, and that at this point begins to win slope. Here the promotion begins in earnest.
At km 5.9 (1120m) you come to an unclear fork: if you are not careful, you will follow the wide footprint (red route) but you can also take the less marked footprint on the left (yellow route). Both arrive at destination and the distance is very similar.
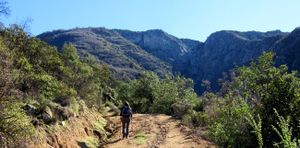
At km 6.9 (1330m) the oak grove begins, which will accompany us almost to the end. The route zigzags to climb the slope. It is a section that, although it has a steep slope, is very green and pleasant. In autumn, it advances on a mattress of leaves. As there are almost no people, for a moment one forgets that we are a few kilometers from a megalopolis of six million inhabitants. At km 7.5 (1470m) the path passes next to the Oak Mother, a much thicker specimen than the rest.
At km 8.7 (1960m) you leave the oak forest. Right at this point, there is a large concrete landmark on the ground. It continues ascending through mountain pastures. Here the path can be lost a little, but the important thing is to continue ascending in the north direction.
After about 300 meters of walk from the forest exit, when the path begins to turn towards the North and before reaching the highest point of this area of the massif, you must leave the path (leading to the Laguna del Inca from Altos de Chicauma) and turn left (waypoint "Leave main trail"). It is not a clear or unique point, but the important thing is not to lose height and start the advance towards the true summit of the massif.
You must advance across the cross country for the next 840 meters. It will be climbed by very gentle slope and in between grasslands and small shrubs towards the back that is located directly towards the West. Without reaching its highest point, skirt it on the right. You will arrive at a corral made with pircas. Border this pen at its southern end (the closest to the cliff) to find the point where the slope to the south has lost slope and can be lowered. There is no path, and it is the most uncomfortable part of the route, although it is not difficult.
After descending only 90 meters (horizontally) you reach (km 9.8 - 2090m) an unusual road, built by a mining company. From now on, it only remains to walk 3 kilometers along this road to the summit. It is a very pleasant walk: almost flat (only goes down to 2038m), and with a permanent view of the valley of Santiago and the Cordillera de Los Andes.
Expected time
Consider something five to six hours uphill, and four hours downhill.
Permisos / Tarifas
 |
Esta ruta es gratis y no se requiere permiso |
|---|
It is about private property. There is a sign that says "Private Enclosure | Do Not Pass," but this refers to vehicle access. Further on there is a public information map, with a description of the route and the characteristics of the area.
Recommendations
- Checklist: Aunque sepas perfectamente lo que debes llevar, es preferible chequearlo al empacar. Esta ruta ha sido clasificada como Type 1 equipment checklist: low altitude route, without camping, snow or cold.
- As the best date for this route is the beginning of June, when the days are short, it is advisable to leave extremely early, to avoid running out of light when returning.
- Even leaving very early, in autumn or winter should bring headlight
Weather forecast
- Meteochile Region of Valparaíso
- Accuweather Valparaíso
- Accuweather Viña del Mar
- Meteochile Metropolitan Region
- Accuweather Santiago
- Accuweather Puente Alto
Photo Gallery
- Altos de Chicauma (2) .JPG
Monte Aconcagua from the Alto Roble massif, July 2017
- == Hire Guides and Tourism Agencies ==
- ** '''Contact''': ecotrekkingchile@gmail.com
- ** '''Phone''': +56948469813 (WhatsApp)


